Uploading Images
There are 3 different ways of inserting images into QDL posts, depending on where the image is, and how much control you want to have over it.
- If the image is on another server (e.g., Wikipedia or Flickr), you can just leave the image there, and add a reference to it in your post. This is the easiest way of adding an image to a QDL post, though leaving the server space and bandwidth up to the remote host (i.e., "hotlinking") isn't always appropriate.
- Navigate to the post that is to contain the image.
- Click the Action Menu icon (
), and select the Edit Full option (
).
- Click the Insert/edit image button (
).
- Paste the URL of the image on the remote server into the Image URL box.
- Click Insert.
- Click Submit.
- If the image is on your local hard-drive, you can upload it to the QDL server. The maximum file size is 0.5 MB, but you should compress images as much as possible, since you'll run out of space very quickly if you don't — registered users only get 1 MB of space for free, which is plenty for people who use QDL just for text, but nothing for people wanting to upload uncompressed images. The advantage to storing images in QDL is that they are just another data type, and thus get the benefit of all of the features for any other type of post, such as the ability to control rights to them, including the ability to sell read rights, and the ability to easily copy-n-paste links to them into other documents. The copyright notice goes wherever links are pasted (unless you explicitly shut it off), so if it's your image, you'll always get credit for it.
- There are 2 ways of uploading images into a parent post.
- If you're editing the parent post, you can just copy-n-paste images straight into the editor.
- In another app, select the image (e.g., with the mouse).
- Copy it (i.e., Ctrl-C on Windows, ⌘-C on the Mac). Note that on the Mac, you have to copy the image from an app, such as Preview, that populates the paste buffer with the base64 representation of the image.
- Switch to the QDL editor.
- Paste the image (i.e., Ctrl-V on Windows, ⌘-V on the Mac) into the post that you're editing.
- On submit, the image will be broken out into its own post, as a child of the post that you were editing.
- From outside of the editor:
- Use the Upload File feature.
- To set the properties of the image post after it has been created:
- Click the Action Menu icon (
), and next to the Metadata option (
), click edit.
- See Properties / Data Type / image for more info.
- To set the position and display characteristics of the image within the parent post:
- Navigate to a post containing an image that has been uploaded.
- Click the Action Menu icon (
), and select the Edit Full option (
).
- Position the cursor within the link to the image.
- Click the Insert/Edit Link icon (
).
- Click the Internal tab.
- Select the desired Alignment.
Figure Numbering
- Click Update to return to the main editor window.
- Click Submit to commit the post to the database, and see the results.
- If you have a description for the image that you want to appear wherever the image gets linked, this can be entered into the "contents" of the image. (QDL doesn't include an image editor, so "editing" an image is just editing the text for the legend.)
- Navigate to the image post that needs the legend.
- Click the Action Menu icon (
), and select the Edit Full option (
).
- Enter the legend text.
- Click Submit.
- Navigate to the parent post containing the image.
- Click the Action Menu icon (
), and select the Edit Full option (
).
- Position the cursor within the link to the image.
- Click the Insert/Edit Link icon (
).
- In the Internal tab, check the First line of contents on title line box.
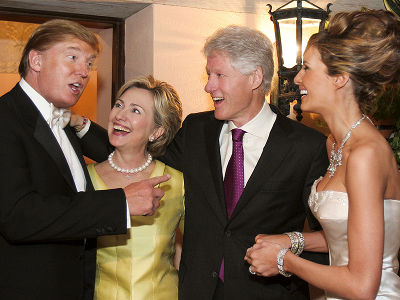
- You can also create hotspots on the image, for clickable links, or just for pop-up text (as in the following example, where the names of the people appear if you hover the mouse over their faces). To do this, you have to enter the map tag into the "contents" of the image.
- Navigate to the image post.
- Click the Action Menu icon (
), and select the Edit Text option (
).
- Enter the map and area tags. For the map name, use the ID of the image post. For example, this code (except with the appropriate angle brackets)...
map name="15943"
area title="donald" shape="rect" coords="20,20,95,110" /
area title="hillary" shape="rect" coords="110,80,176,152" /
area title="bill" shape="rect" coords="200,30,270,115" /
area title="melania" shape="rect" coords="300,30,360,120" /
/map- ...puts the hotspots on the faces in this image...
clumps.jpg
- When editing a post containing an image that was uploaded, there will be a preview of the image. But the preview isn't editable — only the link can be edited, using the Insert/Edit Link dialog. If you view the source for the image preview, you'll see that it's in the "mceNonEditable " class, and anything in that class cannot be edited.


